
For Banzaicon 2014 I wanted to enter the contest with my Jinx cosplay~
I´m no big player of LoL as I play Dota 2, but I really like the characters and the lores behind them in every
of these types of games.
This is rather a easy costume to make and it´s one of the cheapest I´ve made too haha
Costume first
Materials used:
– Two different hues of pink, fabric type: Strechy jersey.
– Skai/faux leather/imitated leather
– Belt buckles I was lucky enough to find at a thrift shop in town.
– old shoes
– toy ammo belts I bought from Ebay
– bandaid
– Body-paint Kryolan
– colorful eyeshades
– Pink shoelaces
These are the images I managed to take during my super stress periode before Banzaicon.
The costume is easy and it´s pretty much just a bikini-top with shorts. Most patterns on making
these parts are on the internet or you can trace your own clothes for a easier reference.
*In this image I have made the one stocking that Jinx has.
It´s pretty forward and I used thights-pants to make my pattern.
To make the stripes the stocking has, I decided I just wanted to
paint them on. Thus you need something to hold the stocking up and also
strech it out to the approximate size of your own leg/thigh.

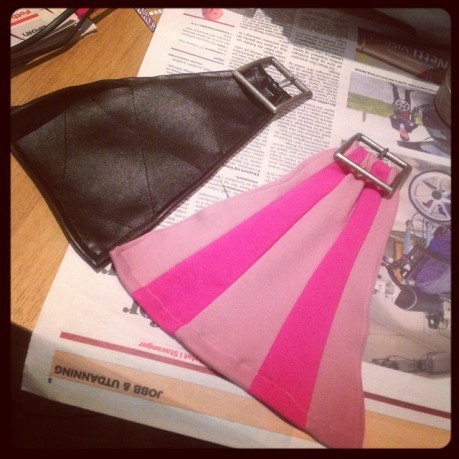
Here you can see how the Bikini-top fits. The opening is in the front and is held by a
giant belt buckle I found at a Thrift shop. I always save tons on just scavenging their belt sections
and buy cheap belts for their buckles.
The Ammo belt was directly sewn onto the belt.
Belt is made out of faux leather which is a bit strechy.
The leather sleeve and gloves are made out of the same fabric as the belts and the one
part of the Bikini.
The pink is all the Jersey fabric I found at the Norwegian store: Stoff&Stil for the Norwegian
cosplayers who might wonder.

The shorts was the thing that took the longest to put together, but was rather easy.
I used one of my own shorts to trace onto some baking paper and made the different stripes
for the two pinks I was gonna use.
I cut them all out from the original pattern, so remember to number them and keep them in order.
it might end up very wrong and uncomfy if you cluster the order and get a part wrong.

And this is how it looks after you pinned all the bits together.
notice that all the pieces are somewhat different, so that is why keeping them in order is really important.
This is only one of the sides tho.
Sew both parts finished before sewing them together : )

The shoes were easy enough. just thread in the pink shoelaces.
I bought mine at a 100Yen shop in Japan, but they are usually easy to
find everywhere.

The wig was the hardest thing to do(in my opinion, because I´m still learning how to do wig-work)
It´s a long wig which I have extended by buying several long extensions from ebay and
local glitter stores.
The bang was done by spraying it to death with different kinds of hairsprays, some gel
and hairdrying.
The length of the wig is about 160cm 😀 and I´m only 158cm

________________________________________________________________
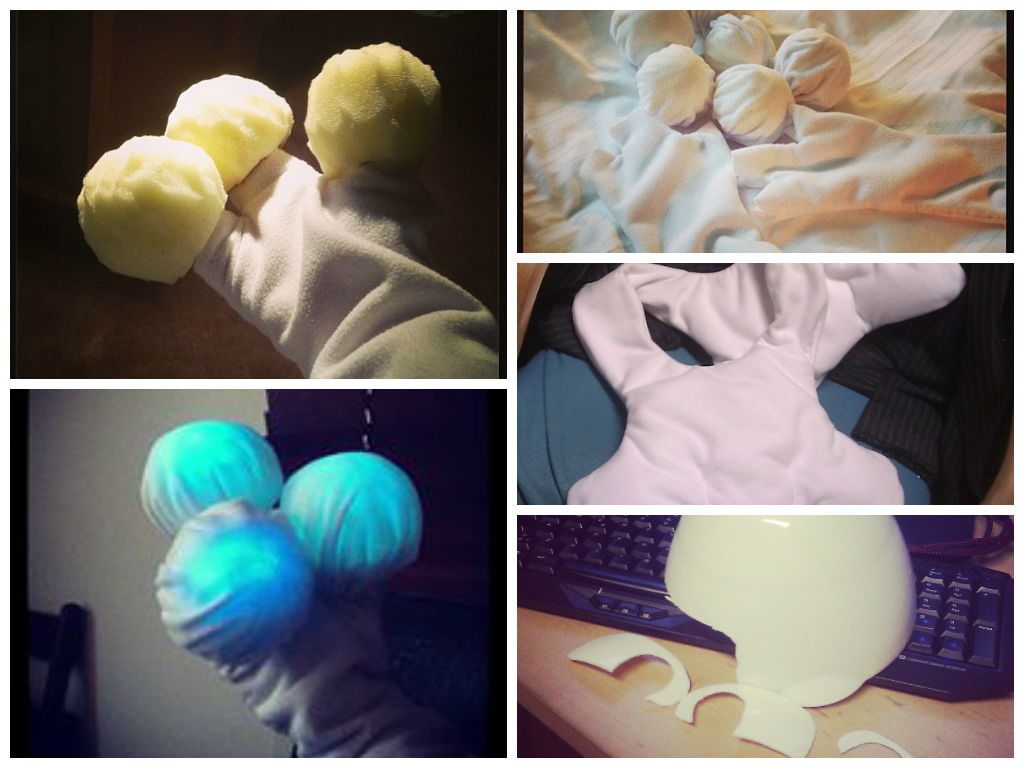
Shock gun
Her shock gun was very questinable while trying to find good references.
Even the in-game and concept arts didn´t really show it well and appearantly for
many other cosplayers it was a bit up to our own imagination how we did it.
Materials:
– Gashapon ball
– Non-transparent plastic sheet
– hot glue
– hair curlers
– Leds
– a toy gun/revolver
– pizza cardboard
– fun foam
– Eva foam
here you can see that I have opened the toy gun and modded in some Leds and some wires actually
going into the handle and made a push button so I can activate it easly while «pretending» I´m using the trigger.
The Leds are stuck in a piece of EVA foam.


The hair rolls were cut apart and I tried my best to push them in with the hot glue (also without buring myself),
so that is why it looks a bit messy on the inside (sorry)…

________________________________________________________________
Fishbones
Making fishbones was a both fun and a bit frustrating experience.
It learned me to work with the cheapest materials ever existing.
Free Cardboard!
Yes! Cardboard is magical and so underrated 😀
Materials:
– Cardboard(a lot of it)
– Masking tape/paint tape
– Glue gun
– wood glue
– water
– torn up newspaper bits
– PVC pipes
– fishing nylon(I think this is the right word for it? no?)
– transparent fimo
– small flashlights or leds
– Cardboard tupe from hardware shops
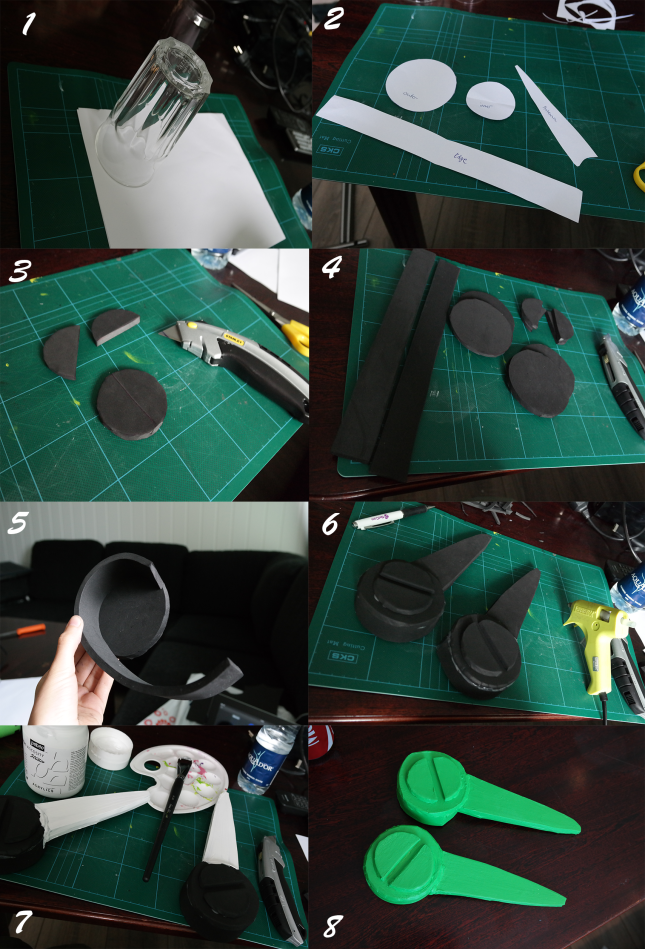
First of I make the basic shapes for the bigger parts and gets the
length I want before I start properly, fitting the bits and fixing minor things.
To make smooth curves on cardboard, just bend it carefully until the surface is the wanted shape.
This is mostly how I buildt the different parts up.
It helped to get the 3D feel of the parts instead of them just being
plain and flat.


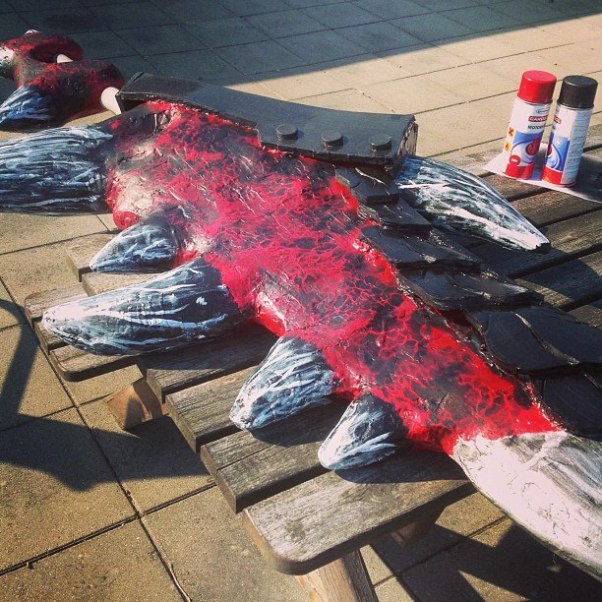
I covered all the pieces with a mix of wood glue and a little bit of water.
Brushed it on with a unwanted paintbrush and let it dry.
When all the pieces are dry, do the same over again with a mix of the glue and water
exept this time you don´t add on the newspaper bits.
the glue mix works as a type of coating/gesso for your project and makes it easier to paint and work
with afterwards.


The paint work took overral about 30 hours to finish. one session lasted 16 hours of only painting,
forgetting that I´m just a humanbeing and need food and to visit the toilet. Watching a serie worked out really
well for once and of course I watched Moomins as it was on about 70 episodes 😀 yay!

When it all was done, and hinged together we could install the lights inside the eye sockets.
The eyeball itself is made out of transparent fimo which I bought off from ebay.
The lights started out as Leds, but is now changed with 2 small flashlights : )
![]()
![]()
![]()
Photos taken by:
http://www.danarki.net/
_________________________________________________________
Pow Pow
Coming soon….


